The Upload Data module enables users to upload files containing spatial data. Once uploaded, the data is saved as a new feature layer. The user can interact with the data as they could any other feature layer.
The user who uploaded the data is the only user who can view it, and when the user's session ends the data is removed from the map.
Add and Remove Uploaded Data
Data files with spatial data can be uploaded by users via the Upload Data tool.
A wizard guides a user through the upload process. The dialog boxes appear in the following order:
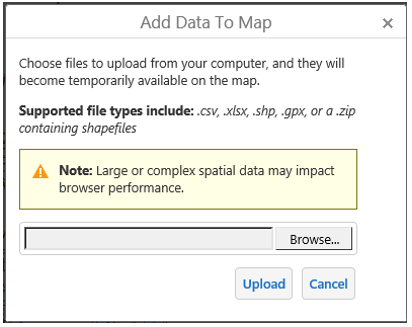
- The Add Data to Map upload form.
The user browses their file system for files to upload.
Note: The Upload Data module only supports multiple simultaneous uploads for shapefiles. When a single shapefile is uploaded, the upload dialog box will allow users to name the layer. When more than one shapefile is uploaded at once, the layers are named: <name>, <name> (0), <name> (1), and so on.
- The Table Mapping Details dialog box.
If the user uploaded a XLSX or CSV file, they must identify the uploaded data's geographical information.
- The Layer Details dialog box.
The user creates a name for the new layer.
- The Table Record Results dialog box.
The viewer alerts the user whether each table record passed or failed.
- The Symbolize Data dialog box.
The user modifies how the new layer is represented on the map. The user can choose the color, size, and shape of the layer's symbols.
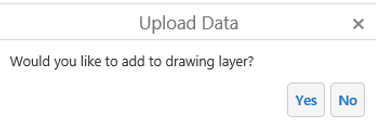
- The spatial data can also be copied to the drawing layer in addition to being created as a feature layer.
The user-added layer appears at the top of the layer list.
To remove a user-added layer, the user presses the ![]() Layer Actions button next to the user-added layer and clicks the Remove Layer action.
Layer Actions button next to the user-added layer and clicks the Remove Layer action.
Supported File Formats
Uploaded data files require either spatial coordinates or address data. While some supported file formats include spatial data by default, CSV and XLSX files require columns in their data tables specifically for spatial coordinates (Latitude and Longitude).
The Upload Data module supports uploads in the following file formats:
CSV - Comma Separated values. The viewer accepts CSVs in UTF-8 encoding. Both Microsoft Excel and Notepad can save CSV files in UTF-8 format.
XLSX - Microsoft excel
KML - Google mapping format
GPX - Route Format for GPS data
ZIP (for shapefiles)
Note 1: If shapefiles are to be published to other sources then the complete shapefile set (.shp, .shx, .dbf, .prj) is required. If you do not plan to publish shapefile data, only the .shp file is necessary to generate shapefile data.
Note 2: The UploadData module only supports multiple simultaneous uploads for shapefiles. When a single shapefile is uploaded, the upload dialog box will allow users to name the layer. When more than one shapefile is uploaded at once, the layers are named: <name>, <name> (0), <name> (1), and so on.
Note 3: The file size limit for uploaded files defaults to 20 MB. (This can be reconfigured)
Table Mapping Details
The Table Mapping Details dialog box allows a user to parse uploaded data correctly. If the user uploaded a XLSX or CSV file, this dialog box also displays a preview of the user's uploaded data for reference.

Spatial Coordinates: If the uploaded file includes labelled columns with geographical coordinates (for example, columns labelled X and Y or Lat and Long), this will be detected and select X Axis Column and Y Axis Column automatically.
Note: By default, the Spatial Reference drop-down menu is set to WGS 1984. If you require another spatial reference system not available in the drop-down menu, you may select Custom WKID/WKT and enter a custom spatial reference in the text input box.

Use first row as header: Select this checkbox if the first row of your data table functions as a label for its corresponding column.
If your data table has no labels, you can label the spatial coordinates or address data using the corresponding drop-down menus. For example, if Spatial Coordinates is selected, you can set the X Axis Column and Y Axis Column.
Symbolize Data
Users can symbolize layers created from uploaded data files. Symbols are chosen during the file upload process. If an uploaded file includes multiple layers, like a FileGDB or KML, then symbols can be chosen for each layer.
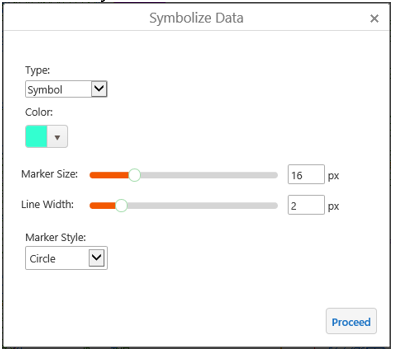
Symbolize Data dialog box
End users can re-symbolize user-added layers on the map. To re-symbolize the layer, select the Layer Actions icon ![]() next to the layer in the layer list and choose Turn on/off layer visualizations. Then, you can use the Custom Layer Styles option to re-symbolize the layer.
next to the layer in the layer list and choose Turn on/off layer visualizations. Then, you can use the Custom Layer Styles option to re-symbolize the layer.