Uploading
The PoW Spatial system allows you to upload pre-drawn activities. This removes the need to draw activities using the drawing tools or fill in the attribute pop-up boxes. To do this, you must be familiar with Geographic Information System (GIS) software and using geospatial data.
The system supports the both shapefile and TAB file format.
A shapefile consists of four individual files; shape file (.shp), shape index (.shx), attribute data (.dbf) and spatial index (.sbn). A projection file (.prj) can also be generated to define the coordinate system. The minimum file requirements for the spatial system are .shp, .dbf and .prj files, although the system will still accept the remaining files of the shapefile. It may be easier to use all the files instead of picking out the required ones.
The minimum file requirements for TAB file are .DAT (attribute data), .ID (links graphics data to database information), .MAP (graphic and geographic information) and .TAB (link to all data files).
The PoW spatial system has certain requirements to accept your shapefiles and TAB files. These requirements are outlined in the document PoW Online Spatial Lodgement (Shapefile Definitions). This document specifies the coordinate systems you can use, what fields are required for each activity and what format the data values need to be in.
To make uploading easier, the Department has created some example shapefiles and TAB files for you to use. These are located on the DMIRS website, under Programmes of Work (or download: Shapefiles, TAB files). You can also download some template shapefiles out of the system using the download function ![]() .
.
- Open the upload function by clicking this button
 .
. - Click and drag your files into the box.

- The system will check your files to make sure they are in the right format and not missing any mandatory information. If the system does not detect any issues, they will be automatically uploaded to the map screen.
- Any validation issues will be flagged for your attention. The system will try and identify what the specific issue is by providing an error message in red. Some examples include:
- Unsupported file type;
- Incorrect or unsupported coordinate system;
- Missing or incorrect field name;
- Missing or incorrect value.

Your files will need to be corrected in your GIS software, and then re-uploaded.
Number of activies impacted refers to the number of rows in your attribute table that contains an error.
Validate against a different Activity Type indicates which activity the system is detecting from your files. If this is incorrect, you can select a different activity to validate against.
You do have the ability to Export Errors into an Excel spreadsheet.
5. Once you have successfully uploaded, your activites should appear on the map screen. The Status Bar indicates whether the upload was successfully, partially successful or has failed.

![]() This button provide more inforamtion about the upload; included when the files were uploaded, the activity and number of individual activites or rows in the upload. Upload error information can also be found here.
This button provide more inforamtion about the upload; included when the files were uploaded, the activity and number of individual activites or rows in the upload. Upload error information can also be found here.
![]() This button allows you to delete the enire upload. Please note an 'undo' function is not currently available.
This button allows you to delete the enire upload. Please note an 'undo' function is not currently available.
Uploading Tips & Tricks
The system supports uploading drill hole locations or drill points. The system currently cannot accept a shapefile that contains more than 500 drill points. This is because the volume of intersections that is required reduces the system performance, resulting in delays. If you intend on uploading a large number of drill points, please consider the following:
- Although the system maximum is 500 points, performance issues have been observed with shapefiles over 200 points. Consider breaking your shapefile down into 200 point files and uploading one at a time. This may take longer, however doing so will ensure the system can appraise your shapefiles correctly.
- Consider using the drilling area option. The PoW Spatial system offers the ability to draw a polygon that indicates where drilling will be occuring. If you are applying for a substantial amount of drill points, it may be easier to draw a polygon around the outer extent of drilling. This will also give you more flexibility to move drill points around without the need to seek additional approval.
The system matches your file to an activity based on fields it detects. For example, if the system sees a polygon shapefile with drill type, sumps and pads etc. it knows it’s a Drilling Area. In some exceptional circumstances, the system might assign the wrong activity, such as calling your costean a camp for instance. To rectify this, you can force the system to validate your files against the correct activity.
The identified activity is shown in the yellow area below.
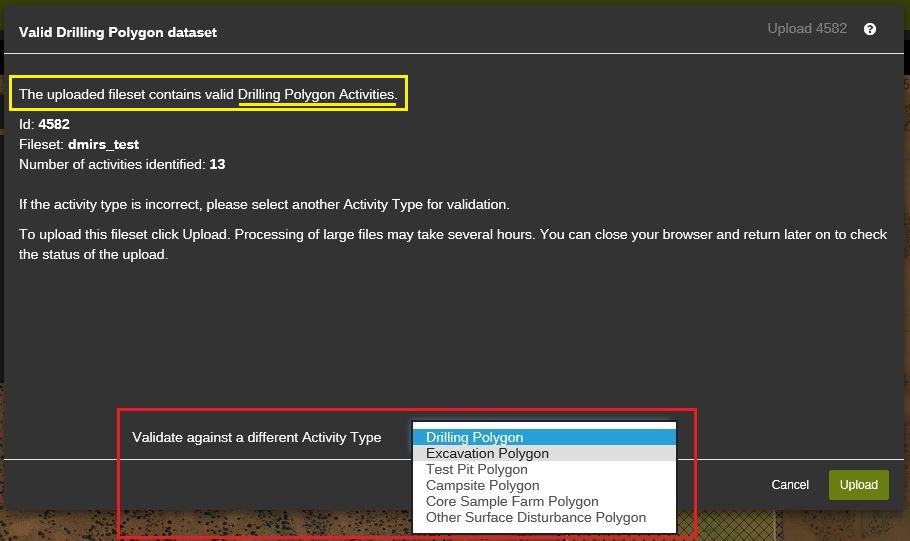
- On the upload screen, select the correct activity (the options box in red above).
- Select Upload to re-validate your files.
- If you are still encountering issues, please check your files against the data definitions document, available from the the DMIRS website.
- Please note, activites can only be changed if they share the same geometry type. For example, all the activities listed in the red area in the image above are polygons. You cannot change a polygon-based activity type to a line or point based activity type.
When you draw a shape over overlapping tenements, for example a miscellaneous licence over an exploration licence, the system will ask you which tenement you are targeting. Uploading is different because the system will automatically assign your activity to the first tenement it intersects. This will invariably be the miscellaneous licence.
These are some steps to take to avoid intersecting with the wrong tenement:
1. Before uploading, ensure the L and G filter is turned on, as shown below.
![]()
This will tell the system to ignore any overlapping miscellaneous licences or general purpose leases.
2. Add a tenement field to your shapefile:
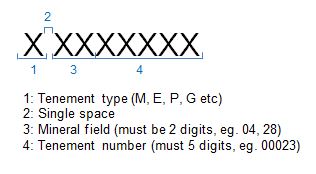
- To specify the tenement you are targeting, add an extra field to your shapefile called TENEMENT_I (short for tenement ID).
- Add the tenement number for each row. Please note the tenement ID must follow this format: